What is Gradient-Weighted Class Activation Mapping (Grad-Cam)?
In this blog post we will learn more about Grad-CAMs in deep learning and specifically, computer vision. What they are, and how to use them to debug computer vision models.
Why Do we need Grad-Cams?
Have you been working on deep learning models like image classifiers or object detectors and ever wondered, “Wow! I am getting such a high (or low) accruacy on this dataset, but I have no clue of what is happening under the hood”.
In other words, our model may or may not be generalizing very well, and we may not have a clear explanation about what is going on. Grad-CAMs, introduced by Selvaraju et al. 2016, were specifically designed to produce visual explanations from a large class of Convolutional Neural Network (CNN)-based models. But now, methods exist to expand grad cams to other class of models, making Deep Learning models more transparent and explainable.
How do Grad-CAMs work? Visual Explanations to Deep learning
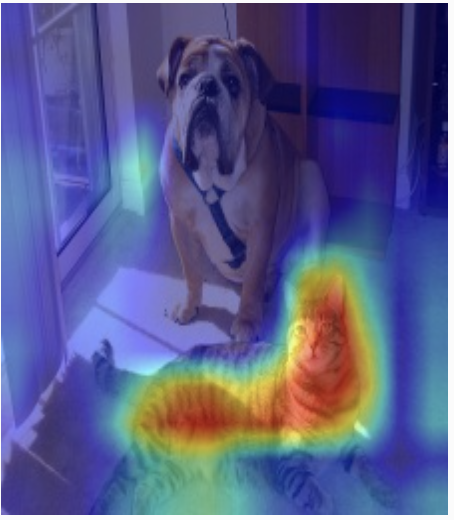
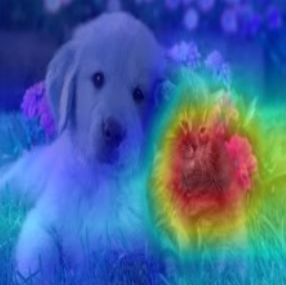
Grad-CAMs use the gradients of any target concept (say ‘dog’ in a classification network or a sequence of words in captioning network) flowing into the final convolutional layer to produce a coarse localization map highlighting the important regions in the image for predicting the concept.
Image data is easy to look at and validate results of the model, atleast for most images in common context, like bikes, chairs, street lamps, people and our favourite class, the cats and the dogs. Classes that are not easily visible to the eye of a layman, maybe harder to validate, especially since we do not understand which factor(s) are causing the model to predict the specific results.
Exploring Grad-CAM with pytorch-grad-cam
Grad-CAM (Gradient-weighted Class Activation Mapping) is a popular technique in computer vision that provides insights into the decision-making process of deep neural networks. In this blog post, we’ll explore Grad-CAM using the pytorch-grad-cam library and see how it can be applied to visualize the important regions of an image.
Using pytorch-grad-cam
pytorch-grad-cam is a powerful Python library developed by jacobgil that simplifies the process of applying Grad-CAM to a variety of neural network architectures. To get started, you can install the library using:
$ pip install grad-cam
More detailed installationa and usage guides can be found on the official website of pytorch-grad-cam.
Now, let’s dive into a simple example:
1. First we import the necessary modules
from pytorch_grad_cam import GradCAM
from pytorch_grad_cam.utils.model_targets import ClassifierOutputTarget
from pytorch_grad_cam.utils.image import show_cam_on_image
from torchvision.models import resnet50
2. Then we load the model, whose visual explanation we are interested in
# Load a pre-trained ResNet model
model = models.resnet50(pretrained=True)
# You can substitue your own model above.
3. Extract the final layer of your model
target_layers = [model.layer4[-1]]
# You can see the layers of your model by print(model)
4. Load and preprocess your image
# Create an input tensor image for your model..
image_path = '/dog-cat-image.jpg'
image = Image.open(image_path)
preprocess = transforms.Compose([
    transforms.Resize((224, 224)),
    transforms.ToTensor(),
])
input_tensor = preprocess(image)
input_batch = input_tensor.unsqueeze(0)

5. Visualize using Grad-CAM
# Construct the CAM object once, and then re-use it on many images:
cam = GradCAM(model=model, target_layers=target_layers)

grayscale_cam = cam(input_tensor=input_tensor, targets=targets)
6. Display results
grayscale_cam = grayscale_cam[0, :]
visualization = show_cam_on_image(rgb_img, grayscale_cam, use_rgb=True)
pytorch-grad-cam library also supports other visualization techniques [HiResCAM, ScoreCAM, GradCAMPlusPlus, AblationCAM, XGradCAM, EigenCAM, FullGrad] that can be imported as classes and used.
Explore the pytorch-grad-cam documentation for more advanced features and customization options.
Happy exploring with Grad-CAM and pytorch-grad-cam!